

Innehållsförteckning
Facebook Reels won’t pay your bills directly. The real answer to how to monetize Facebook Reels is to treat every clip as top-of-funnel reach and funnel viewers to one fast subscription destination where they actually become paying fans. Meta’s own creator guidance frames short-form video as a discovery channel, not a checkout counter, and your landing page should load in under a few seconds on mobile to capture that attention before it evaporates.
- Bio link pointing to one subscription page (FanSpicy or your platform of choice)
- Pinned comment repeating that same destination
- A single, trackable landing page with visible pricing
Proffstips: Pick one destination link and stop changing it every week. Split-test the page itself, not the URL people have already memorized.
Key Takeaways
Facebook Reels earn creators money only when paired with a fast, single-destination subscription page that converts clicks into paying fans.
| Point | Details |
|---|---|
| Treat Reels as reach only | Use Reels for discovery and awareness, never as the place you try to sell directly. |
| Repeat one CTA everywhere | Bio link, pinned comment, caption, and video overlay should all point to the same destination. |
| Fix the landing page first | Fast load time, visible pricing, and multiple payment methods matter more than lowering your price. |
| Deliver value in 48 hours | Immediate onboarding content and a clear content schedule reduce first-month churn. |
| Choose FanSpicy as your destination | FanSpicy combines subscriptions, tips, live streams, and messaging so your funnel has one working home. |
Innehållsförteckning
- Quick Setup Checklist for Facebook Reels Monetization
- What Should You Post on Reels to Drive Clicks?
- Where Should You Put Your Call to Action?
- What Makes a Subscription Landing Page Convert?
- How Should You Price and Structure Your Offer?
- How Do You Keep Subscribers Past Month One?
- Which Metrics and Tests Actually Move the Needle?
- How FanSpicy Supports the Reels-to-Subscriber Funnel
- Facebook’s Monetization Policies and Reels Eligibility
- Setting Up Reels for Monetization in the Facebook App
- Optimizing Reel Content for Maximum Funnel Performance
- Ad Placement Options Within Facebook Reels
- Brand Partnerships and Sponsorships for Reels Creators
- Combining Reels With Facebook Stars and Fan Subscriptions
- Ready to Turn Reels Views Into Paying Fans?
- Vanliga frågor och svar
- Sources
Quick Setup Checklist for Facebook Reels Monetization
You can build this funnel in one sitting. Here’s the order that works:
- Set your bio link. Point it to a single subscription URL, or a neutral bio-link page if Facebook’s link restrictions make direct linking risky.
- Write your CTA template. Something like: “Full clip + more waiting for you. Link in bio.” Reuse this pattern on every Reel so followers learn where to look.
- Pin a comment repeating the link and a one-line reason to click, since captions get buried fast in the comment feed.
- Test your landing page on your own phone. Confirm it loads quickly, shows pricing without scrolling, and lists accepted payment methods above the fold.
- Add UTM parameters to your bio link so you know exactly which Reel sent which signup.
Proffstips: Change one UTM tag per posting week (utm_content=reel1, reel2, etc.) so your analytics tell you which video style actually converts, not just which one racked up views.
What Should You Post on Reels to Drive Clicks?
Post the trailer, not the movie. The clips that convert best hint at paid value instead of trying to deliver it for free. If viewers get everything they want inside the free Reel, they have zero reason to click through.
- 15 to 30 second teasers that cut away right as the payoff builds
- Before/after formats that show a transformation but hold back the full reveal
- Short personal moments (a day-in-the-life snippet, a behind-the-scenes beat) that end on a direct question or curiosity hook
Keep your on-screen text and captions simple: one line telling people what’s waiting and where to find it. Avoid phrasing that reads as explicit sales language, since aggressive wording is more likely to get flagged by content moderation systems. Consistent short-form posting built around hybrid monetization, meaning subscriptions, tips, pay-per-view content, and live sessions working together, tends to outperform sporadic attempts at going viral. Posting daily or near-daily beats posting a handful of “perfect” Reels a month, because the algorithm and your audience both reward consistency over polish.
Proffstips: Batch-film five to seven Reels in one session using the same hook structure, then space them out across the week. This gives you consistency without daily filming fatigue.
Where Should You Put Your Call to Action?
Repetition beats cleverness here. A predictable CTA in the same spot every time trains your audience where to look, and that consistency is what actually converts, not a wittier caption. A five-stage funnel of attract, engage, nurture, convert, and retain only works if the “convert” step is easy to find and identical every time.
Put your CTA in four places on every single Reel:
- Bio link: your one canonical destination, never rotating
- Pinned comment: repeats the link with a specific reason to click
- Caption: one short line, not a paragraph of hype
- In-video text overlay: a two-second reminder near the end of the clip
Phrase the CTA around curiosity plus a low-commitment next step rather than a hard sell: “The rest of this is only in one place” reads better than “Subscribe now for exclusive content.”
- Route the CTA to a neutral bio-link landing page first, not straight to your subscription checkout.
- Add an age gate and basic tracking on that page.
- A/B test which destination link (subscription page vs. preview page) converts more clicks into signups.
This buffer page also protects you from moderation risk while giving you a cleaner testing ground.
What Makes a Subscription Landing Page Convert?
Speed and clarity beat price as a conversion lever for anyone arriving from a 15-second Reel. Reducing friction on mobile, meaning fast load time, visible pricing, and a checkout under a couple of minutes, does more for conversion than shaving a few dollars off your subscription tier.
Your landing page needs:
- A headline stating exactly what the subscription includes, not a vague “exclusive content” promise
- Pricing tiers visible without scrolling or tapping through menus
- One-click or minimal-step payment options
- A short proof element, like a subscriber count or a sample post thumbnail
Payment-method checklist: offer PayPal, Apple Pay, major cards, and regional alternatives like Klarna or SOFORT where your audience is based. Card-only checkouts lose fans in markets where those alternatives are the default, and every extra payment step is a chance for someone to abandon the signup entirely.
First-value onboarding matters just as much as the payment screen. Let new subscribers preview a piece of content or receive a short welcome message the moment they sign up, before they have time to second-guess the purchase.
| Metric | What It Tells You |
|---|---|
| Reel to landing CTR | How many viewers actually clicked your bio link or CTA |
| Landing conversion rate | How many of those clicks turned into paid signups |
| Payment abandonment rate | Where fans dropped off during checkout |
Proffstips: If your CTR is healthy but conversion is flat, the problem almost always lives on the landing page, not the Reel. Fix the page before you make more content.
Test one variable at a time: swap your headline, then your CTA button copy, then your payment options, and give each version enough traffic before declaring a winner.
How Should You Price and Structure Your Offer?
Price is a signal, not just a number. A tier that’s too cheap can actually read as low value and hurt conversion, while a clear, benefit-specific tier structure tells fans exactly what they’re buying.
A simple three-tier model works for most creators:
- Base tier: low friction, entry-level access, priced to remove hesitation
- Mid-tier: weekly exclusive drops, positioned as the “most popular” option
- Top-tier: direct access or custom requests, priced for your most engaged fans
Subscription pricing works best when it’s tied to a specific, repeatable deliverable, like a weekly drop or a monthly live session, rather than a vague promise of “more content.” Scarcity language (“this week’s drop,” “limited monthly slots”) justifies the price better than generic marketing copy. Test a higher-priced mid-tier before assuming you need to go cheaper; underpricing is a more common mistake than overpricing.
How Do You Keep Subscribers Past Month One?
The first 48 hours decide whether a fan sticks around. Immediate, obvious value right after signup is the strongest retention lever you have, stronger than anything you do in month two.
- Send a welcome message the moment someone subscribes
- Deliver one piece of exclusive content immediately, not “coming soon”
- Lay out a clear schedule: what drops, and when
Keep a consistent publishing cadence for paid tiers, whatever that cadence is, and build a short re-engagement sequence for fans who go quiet. Small personal touches, using a fan’s name, replying to comments, matter more at this stage than any amount of extra content volume.
Proffstips: A single personalized reply to a new subscriber’s first comment can do more for month-one retention than an extra piece of content that week.
Which Metrics and Tests Actually Move the Needle?
Track four numbers: Reel CTR to your bio link, landing-page conversion rate, payment abandonment rate, and month-one retention. Everything else is secondary.
Run these three tests first:
- CTA phrasing test: curiosity-driven copy vs. direct offer language
- Landing headline test: benefit-first vs. feature-first wording
- Payment-method test: does adding a local payment option lift completed checkouts
Reducing checkout friction, faster mobile load, visible pricing, and fewer steps, is one of the highest-leverage moves available to anyone converting social traffic into paying customers.
Keep each test small and time-boxed. At creator scale, a week or two of consistent traffic is usually enough to see a real signal.
How Long Until You Get Your First Subscriber?
You can set this funnel up in a single session. First subscribers often arrive within a few weeks, depending on your existing reach and posting consistency.
- Profile and bio setup: about 1 hour
- Content batch for Reels: 1 to 2 hours
- Landing page polish and testing: 1 to 3 hours
Budget for the platform’s revenue share (a commission on each transaction), optional ad spend if you choose to boost a Reel, and minor costs for bio-link or tracking tools.
How FanSpicy Supports the Reels-to-Subscriber Funnel
FanSpicy is built for exactly this workflow: creators sending short-form traffic to one destination that converts. The platform supports subscriptions, tips, live streams, paid bundles, and secure direct messaging, so your Reels funnel doesn’t dead-end at a single revenue stream.
- Fast registration means you can have a working subscription page live before your next Reel batch
- Multiple payment methods reduce the abandonment problem covered earlier
- A creator dashboard lets you preview what fans see before you send traffic to it
Proffstips: Link your dashboard preview in your bio-link page copy so fans know what they’re subscribing into before they hit checkout, it reduces the “surprise” factor that kills conversions.
FanSpicy’s hybrid monetization approach matches the funnel logic covered throughout this guide: Reels for reach, one destination for conversion, multiple tools once a fan lands there.
Facebook’s Monetization Policies and Reels Eligibility
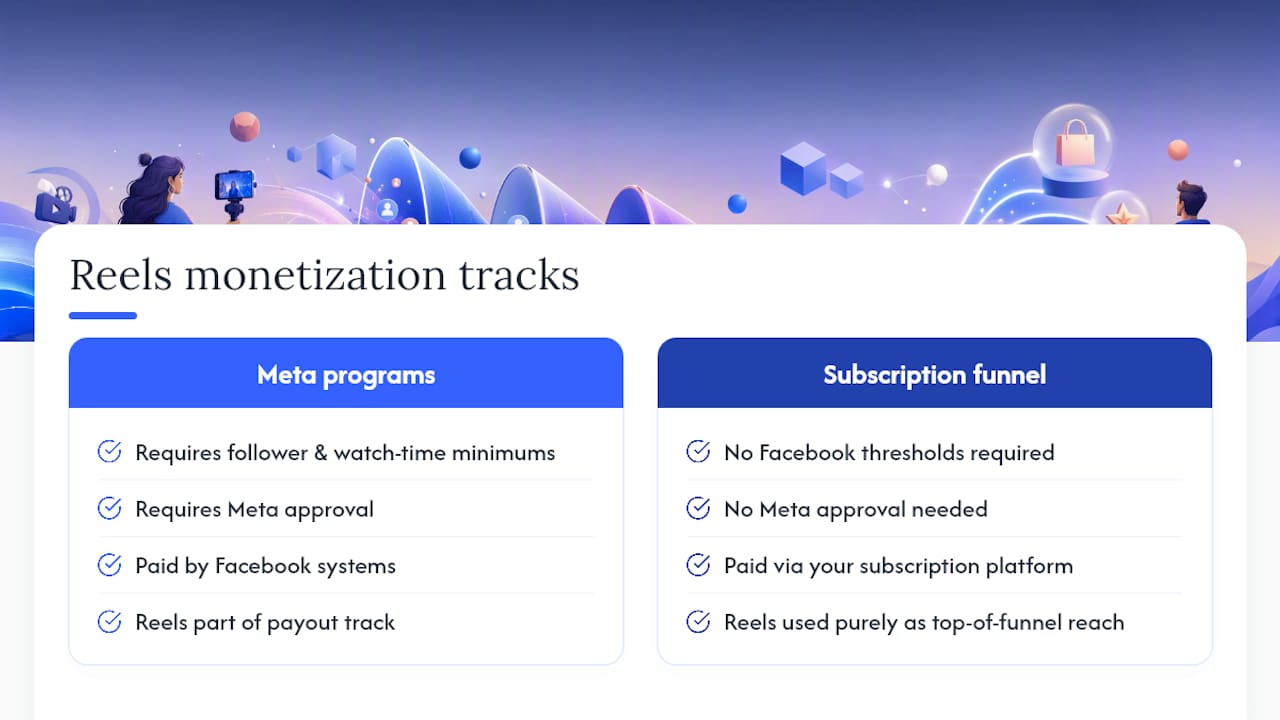
Facebook’s native Reels monetization programs, things like performance bonuses and in-stream ad revenue, require creators to meet specific eligibility thresholds around follower counts, watch time, and adherence to Meta’s Content Monetization Policies. Those programs pay Meta-approved creators directly through Facebook’s own systems.
That’s a separate track from what this guide covers. The funnel approach described here doesn’t depend on Facebook approving you for its internal payout programs at all. Instead, you use Reels purely as reach, exactly the top-of-funnel role Meta’s own creator guidance describes, and you route the actual revenue through your own subscription platform.
This matters practically: you don’t need to hit Facebook’s follower or watch-time minimums to start earning. A creator with 2,000 engaged followers can build a profitable subscription funnel long before qualifying for Facebook’s own bonus programs, because the money isn’t coming from Facebook at all. It’s coming from fans who click through and subscribe.
Still, staying within Meta’s community standards and content policies matters even when you’re not chasing their bonus programs. Reels that get flagged or removed for policy violations lose you reach regardless of your monetization model, so treat compliance as protecting your funnel’s top end, not just a box to check for a payout program you’re not using.
Setting Up Reels for Monetization in the Facebook App
Enabling Reels monetization features inside the Facebook app or Creator Studio starts with confirming your account is set up as a Professional Mode profile or connected Facebook Page, since personal profiles have limited access to creator tools. From there, the Professional Dashboard shows available monetization options based on your eligibility status.
For the funnel strategy in this guide, your setup priorities look different from a creator chasing Facebook’s bonus programs. You still want Professional Mode enabled, since it unlocks Reels insights showing watch time, reach, and audience retention, data you need to figure out which clips actually drive clicks to your bio link.
Check these settings before you post your first batch:
- Confirm your bio link field is editable and set to your subscription destination
- Turn on Insights so you can see per-Reel performance, not just aggregate page stats
- Review your Page or Profile’s “About” section to make sure it reinforces your CTA rather than contradicting it
You don’t need to apply for or wait on approval for Facebook’s own monetization programs to start funneling viewers to a paid subscription elsewhere. That’s the core advantage of this approach: setup time depends on you, not on Meta’s review queue.
Optimizing Reel Content for Maximum Funnel Performance
Trending audio genuinely helps discoverability, Reels using popular sounds tend to get pushed into more “For You” style feeds, but audio choice should never override your hook. Pair a trending sound with your own teaser structure rather than building a Reel around the audio alone.
Hashtag strategy works best kept simple: two to three niche-relevant tags beat a wall of generic ones. Broad tags like #fyp compete against millions of other Reels, while a specific tag tied to your content type reaches a smaller but more relevant audience.
Reel length matters for the funnel specifically because you need room to build curiosity without giving away the payoff. Clips in the 15 to 30 second range tend to hold attention long enough to plant a hook while staying short enough to avoid the drop-off that longer clips see. Types of content that maximize revenue generally lean into short, high-retention formats over long-form explainers for exactly this reason.
Posting consistency compounds all of this. A single trending-audio Reel might spike views once, but a near-daily posting cadence using the same hook-and-CTA formula builds the repeated exposure your bio link needs to actually convert. Treat each Reel as one more chance for someone who missed the last five to see your CTA for the first time, not as a standalone bet on going viral.
Ad Placement Options Within Facebook Reels
Facebook offers several ad formats tied to Reels: overlay ads that appear as a banner near the bottom of a Reel, post-loop ads that play after a Reel finishes and loops, and standard in-feed Reels ads that appear as sponsored content between organic clips.
These formats exist primarily for advertisers running paid campaigns and for creators enrolled in Facebook’s own revenue-share programs on eligible content. For the funnel strategy this guide focuses on, these native ad placements aren’t your revenue engine, your subscription platform is. But understanding them still matters for one reason: if you choose to boost a Reel as a paid ad to extend its reach, you’re competing for space alongside these same formats, and your creative needs to work as both organic content and paid placement.
If you do test paid boosting on a Reel, boost your best-performing organic teaser rather than a Reel built specifically as an ad. A clip that already earned strong watch time and click-through organically is a safer bet for ad spend than an untested one, since you’re paying to amplify a hook that’s already proven it works.
Brand Partnerships and Sponsorships for Reels Creators
Brand deals work differently when your primary monetization is subscription-based rather than ad-revenue-based. A sponsor paying for a mention in your Reel wants reach and engagement; they’re generally not concerned with whether your bio link points to a subscription platform, an online store, or an affiliate link.
That gives independent creators leverage. You can negotiate sponsorships as a secondary revenue stream that runs parallel to your subscription funnel, rather than needing to choose between the two. A sponsored Reel can still end with your standard CTA and bio link, as long as the sponsor’s required disclosure and messaging come first.
Be selective about fit. A sponsor whose product or audience clashes with your subscription content confuses your funnel message and can cost you conversions on that Reel even if the sponsorship itself pays well. The strongest partnerships come from brands whose audience overlaps naturally with people already inclined to click through to your subscription page, since that audience is more likely to convert on both the sponsored ask and your regular CTA.
Combining Reels With Facebook Stars and Fan Subscriptions
Facebook has its own native fan monetization tools, Stars (where viewers send paid virtual gifts during live video or on posts) and Facebook Fan Subscriptions (a recurring payment feature for eligible Pages). These sit alongside, not in place of, the external funnel strategy in this guide.
There’s no conflict in running both. Stars and Facebook’s native fan subscriptions capture viewers who want to support you without ever leaving Facebook, while your Reels-to-landing-page funnel captures viewers willing to click through for a more complete subscription experience elsewhere. Some creators use Facebook Live sessions to earn Stars in real time while simultaneously mentioning their off-platform subscription page verbally, since live video allows more natural, extended CTAs than a 15-second Reel.
Treat Facebook’s native tools as a way to monetize the audience segment that won’t click off-platform, and your external subscription funnel as the way to capture the segment that will. Running both means no viewer type gets left with zero monetization path, whether they prefer to stay entirely inside Facebook or are willing to subscribe elsewhere for deeper access.
A note on treating Reels as reach, not revenue
Creators who chase Facebook’s own bonus thresholds often wait months for eligibility that never fully pays off. The funnel approach in this guide works because it doesn’t depend on Meta’s approval at all, only on your own consistency and a landing page that doesn’t get in the way.
Ready to Turn Reels Views Into Paying Fans?
FanSpicy gives you what a generic bio-link tool can’t: subscriptions, tips, live streams, paid bundles, and messaging all built into one dashboard, so the Reels funnel described in this guide has an actual destination on day one.
Registration takes minutes, not days, and you can have a working subscription page live before your next batch of Reels goes out. Multiple payment methods are built in from the start, which means you skip the abandonment problems that plague card-only checkouts. If you’re ready to stop sending Reels traffic to a dead end, set up your FanSpicy profile today and point your next bio link update at a page built to convert.
Vanliga frågor och svar
Do I need a large following to monetize Facebook Reels this way?
No. Conversion mechanics, meaning a clear offer, an easy signup, and the right payment options, tend to matter more than raw follower count. A smaller, engaged audience with a well-built funnel often outearns a bigger one with a messy checkout.
Can I link directly to my subscription page from a Reel?
You can, but many creators use a neutral bio-link landing page as a buffer first. It reduces moderation risk and lets you track and test which destination converts better.
How is this different from Facebook’s own Reels bonus programs?
Facebook’s native programs (Stars, in-stream ads, performance bonuses) pay creators directly through Meta based on eligibility requirements like follower counts and watch time. This funnel approach uses Reels purely for reach and sends viewers to your own subscription platform, so it doesn’t depend on Meta’s approval at all.
What’s the biggest mistake creators make with Facebook Reels monetization?
Giving away too much in the free clip. If a Reel answers the viewer’s curiosity completely, there’s no reason left to click through. The best-performing teasers end on a hook, not a resolution.
How often should I post Reels to build this funnel?
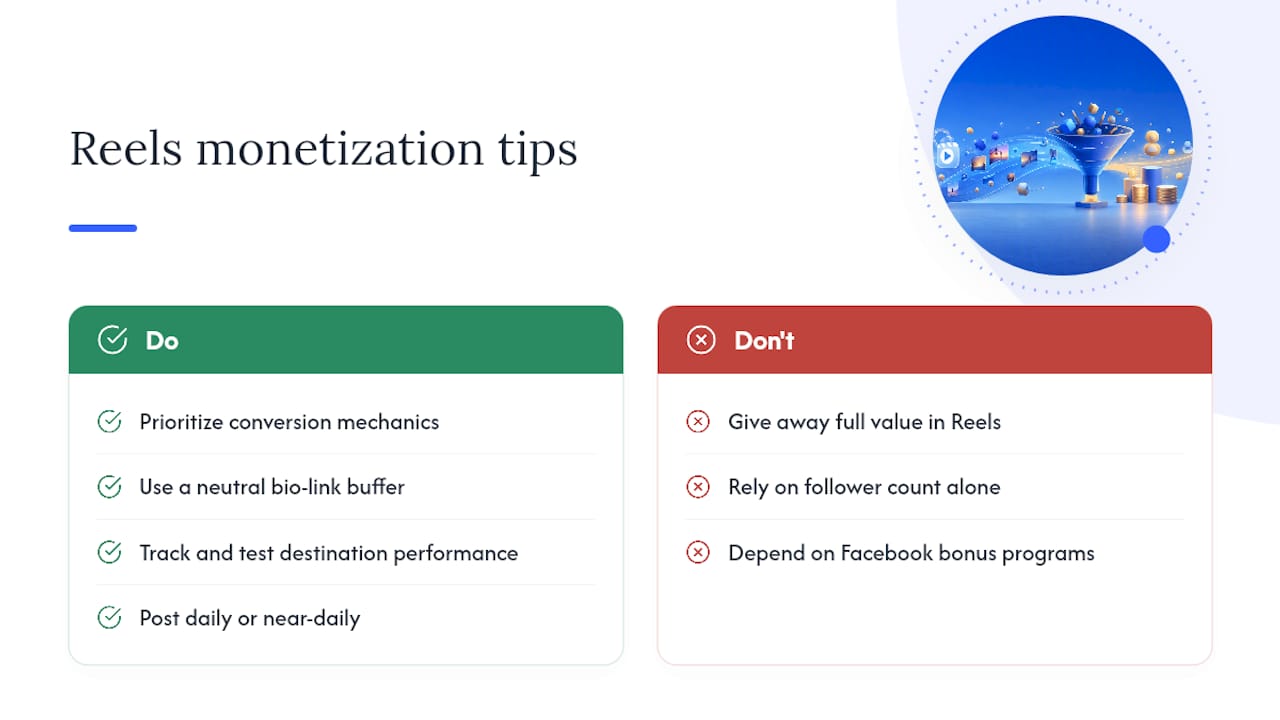
Daily or near-daily short-form posting outperforms sporadic attempts at a viral hit. Consistency trains your audience to expect and look for your CTA every time.
Sources
- How to Turn Social Media Followers into Paying Customers in 2026
- How to Turn Your Social Media Followers Into Paying Customers in 5 Steps