
Зміст
TL;DR:
- Setting up live streams involves preparing hardware, software, and platform settings for real-time broadcasting.
- Following a structured routine helps creators troubleshoot issues early and focus on audience engagement.
Setting up live streams is the process of preparing your hardware, software, and platform settings to broadcast live video to your audience in real time. Whether you stream on YouTube, Twitch, or a paid platform like Fanspicy, the core workflow stays the same: verify your equipment, configure your encoding software, connect to your platform, and go live. This guide covers every step of that process, from your first webcam purchase to troubleshooting dropped frames mid-broadcast. Creators who follow a structured setup process spend less time fixing problems and more time building the audience engagement that drives monetization.
What equipment and internet setup do you need for live streaming?
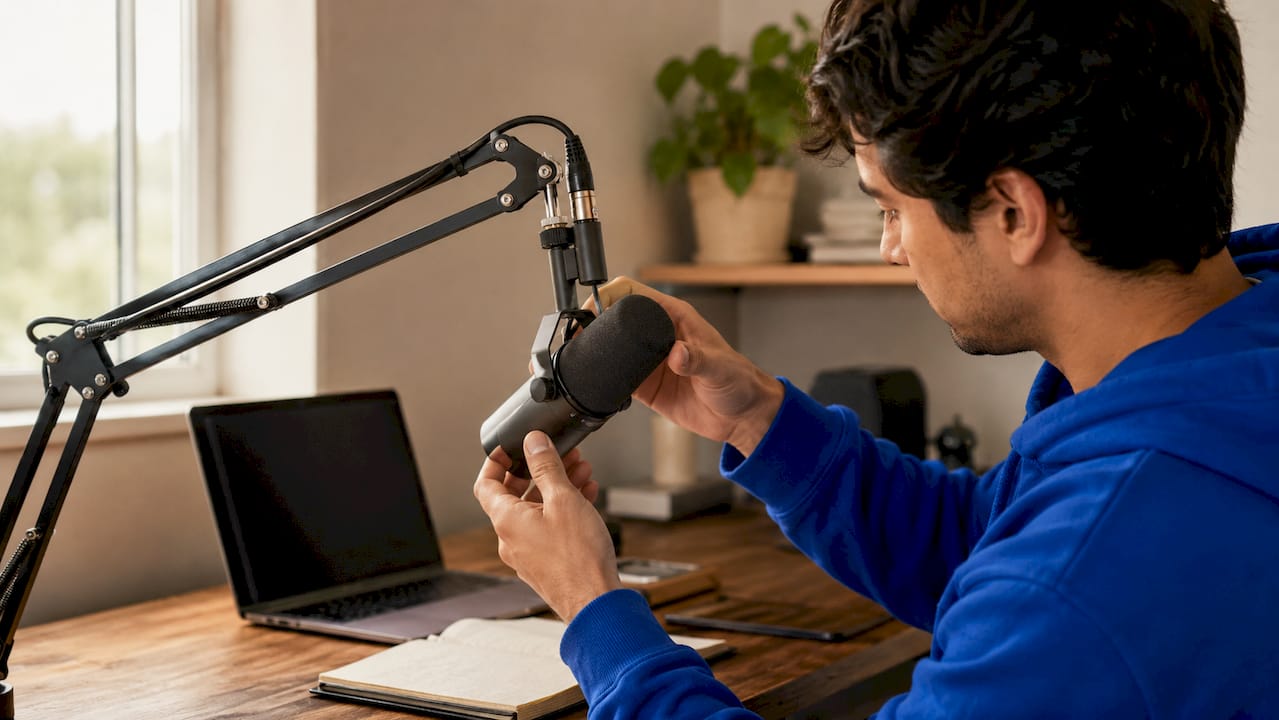
Your live streaming setup starts with three physical components: a camera, a microphone, and a stable internet connection. Everything else is secondary.
Camera options
A basic webcam like the Logitech C920 handles 1080p at 30fps and works for most creators starting out. A dedicated mirrorless or DSLR camera connected via a capture card, such as the Elgato Cam Link 4K, gives you sharper image quality and more control over depth of field. The upgrade matters most for creators whose visual presentation is central to their content.
Audio comes first
Audio quality beats video quality every time. Viewers tolerate a slightly soft image, but they leave immediately when audio is muffled or distorted. The recommended upgrade order is: microphone first, then lighting, then camera. A USB condenser mic like the Blue Yeti or Audio-Technica AT2020 costs under $150 and transforms perceived production value overnight.
Порада професіонала: Record a 60-second test clip before every stream and listen back on headphones. You will catch echo, hum, and gain issues before your audience does.
Internet requirements
Upload speed is the single most important network variable. A 1080p stream at 30fps requires a bitrate of 4,500–6,000 kbps, which means you need a consistent upload speed well above that range to leave headroom. Always test your upload speed during the exact hour you plan to stream. Household network congestion in the evening can cut your effective upload speed significantly compared to an off-peak test.
Minimal vs. recommended equipment:
- Minimal: Built-in webcam, built-in laptop mic, 10 Mbps upload, wired ethernet
- Recommended: Dedicated 1080p webcam or capture card setup, USB condenser mic, 25+ Mbps upload, wired ethernet, ring light or softbox
How to configure your streaming software for a successful broadcast
OBS Studio is the industry standard for free, open-source broadcast software. Streamlabs and XSplit are popular alternatives with more built-in templates. The configuration process is the same across platforms: connect your stream key, set your encoder, and define your output resolution.
Step-by-step OBS Studio configuration
- Get your stream key. Log into YouTube Studio, Twitch, or your chosen platform and navigate to the live streaming or creator dashboard. Copy the stream key and the server URL.
- Enter your stream settings in OBS. Go to Settings > Stream. Select your platform from the Service dropdown or choose “Custom” and paste the RTMP server URL and stream key manually.
- Choose your protocol. Standard RTMP uses port 1935. RTMPS on port 443 is the better choice because port 1935 is frequently blocked by firewalls, while port 443 is open on virtually every network and encrypts your transmission.
- Set your bitrate. Match your bitrate to your upload speed. For 1080p at 30fps, target 4,500–6,000 kbps. For 720p at 30fps, 2,500–4,000 kbps is sufficient.
- Select your encoder. Software encoding with x264 works on any machine but uses CPU. Hardware encoding with NVENC (Nvidia) or AMF (AMD) offloads the work to your GPU and reduces CPU strain significantly.
- Configure resolution and FPS. Set your base canvas to your monitor resolution and your output resolution to 1920×1080 or 1280×720. Use 30fps for talking-head content and 60fps for gaming or fast-motion streams.
- Build your scenes. In OBS, a scene is a saved layout. Add sources inside each scene: your webcam feed, a screen capture, a browser source for alerts, and a microphone input. Name each scene clearly (e.g., “Main Camera,” “Screen Share,” “BRB Slide”).
Порада професіонала: Always run a private or unlisted test stream before going live. A five-minute private broadcast reveals audio sync issues, dropped frames, and encoding errors before your audience sees them.
What are the common live streaming platforms and how do setups differ?
Each platform has its own requirements, latency profile, and audience engagement tools. Choosing the right one depends on your content type and monetization goals.
Platform comparison
| Платформа | Verification required | Latency | Engagement tools | Best for |
|---|---|---|---|---|
| YouTube Live | Channel verification + age 16+ | 10–12 sec (RTMP/HLS) | Super Chats, polls, chat | Long-form, VOD repurposing |
| Twitch | Email verification | 2–5 sec (low latency mode) | Bits, channel points, raids | Gaming, community building |
| Facebook Live | Facebook account | 10–15 sec | Reactions, comments | Broad social reach |
| Фанфікшн | Account registration | Low latency | Paid interactions, tipping | Monetized creator content |
YouTube requires channel verification and no restrictions for 90 days before live streaming unlocks. Creators under 16 cannot go live on YouTube at all. Twitch is more permissive on account requirements but enforces strict content guidelines.
On the protocol side, RTMP to HLS introduces 10–12 seconds of latency. WebRTC cuts that to near real-time, which matters for interactive content where audience response timing affects the experience. Platforms like Fanspicy that prioritize real-time creator engagement benefit most from lower-latency protocols.
How to monitor, troubleshoot, and improve your live streaming experience
Stream quality degrades in predictable ways. Knowing the warning signs lets you fix problems before viewers notice.
Real-time monitoring of CPU, memory, and network usage is the most effective way to prevent technical failures during a broadcast. OBS Studio displays dropped frames and encoding lag in its status bar. Watch those numbers continuously, not just at the start of your stream.
Troubleshooting checklist:
- Dropped frames: Lower your bitrate by 500–1,000 kbps. Switch from Wi-Fi to a wired ethernet connection. Check for background applications consuming bandwidth.
- Audio/video sync issues: Add a fixed audio delay offset in OBS under Advanced Audio Settings. A capture card delay of 100–200ms is common and correctable.
- Stream keeps disconnecting: RTMP connections break instantly when the TCP connection drops. Use RTMPS on port 443 to avoid firewall interference. Keep a backup stream key from a secondary platform ready.
- Firewall blocking your stream: Switch from RTMP (port 1935) to RTMPS (port 443) in your OBS stream settings. This resolves most institutional and hotel network blocks.
- CPU overload: Switch from x264 software encoding to NVENC or AMF hardware encoding. Reduce your output resolution from 1080p to 720p temporarily.
- Chat moderation falling behind: Use OBS’s built-in browser dock or a third-party tool like Streamlabs chatbot to automate keyword filtering and slow-mode activation.
A secondary internet connection, such as a mobile hotspot, is the most underused reliability tool in a creator’s kit. Keep one ready and tested before every major stream.
What is the step-by-step live streaming process for creators?
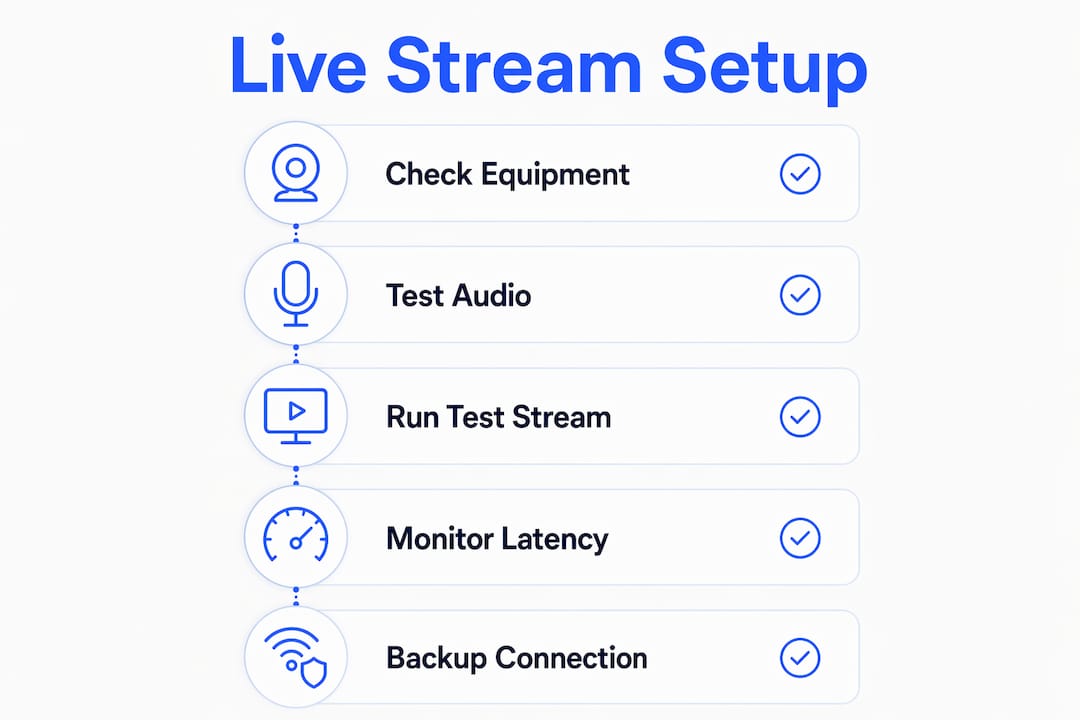
A consistent pre-stream routine removes the mental load of remembering what to check. Run through this checklist before every broadcast.
- Equipment check. Power on your camera, microphone, and lighting. Confirm all devices appear in OBS as active sources.
- Software check. Open OBS. Verify your stream key matches the current session key from your platform dashboard. Platforms rotate keys periodically.
- Audio balance. Speak at your normal stream volume and confirm your microphone peaks between -12 dB and -6 dB in OBS’s audio mixer. Avoid clipping above 0 dB.
- Run a private test stream. Go live on an unlisted or private setting for 3–5 minutes. Check the recording or playback for sync, audio clarity, and visual quality.
- Network check. Run a speed test. Confirm your upload speed is at least double your target bitrate to leave headroom for spikes.
- Go live. Switch your stream to public. Announce your start in your community channels or schedule the stream in advance so followers get a notification.
- Monitor during the stream. Watch OBS’s dropped frames counter and CPU usage. Keep a second device open to view your stream from the audience’s perspective.
- Post-stream review. Download the VOD. Watch the first five minutes and the last five minutes to catch recurring issues. Note what to fix before the next session.
Порада професіонала: Build a physical checklist card and keep it next to your setup. Consistent routines reduce errors and lower pre-stream anxiety, which shows up in your on-camera energy.
Repurposing your VOD is a free growth tactic most creators ignore. Clip highlights for short-form content on YouTube Shorts or TikTok. A single two-hour stream can generate five to ten clips worth posting.
Key takeaways
Setting up live streams successfully requires the right equipment, correct software configuration, and a consistent pre-stream routine that you run before every broadcast.
| Point | Details |
|---|---|
| Audio before video | Upgrade your microphone before your camera. Poor audio drives viewers away faster than soft video. |
| Match bitrate to upload speed | Target 4,500–6,000 kbps for 1080p30. Always test your upload speed at your actual stream time. |
| Use RTMPS over RTMP | RTMPS on port 443 avoids firewall blocks and encrypts your stream. Use it by default. |
| Run a private test stream | A 3–5 minute unlisted test before every broadcast catches sync and encoding issues early. |
| Monitor in real time | Watch OBS’s dropped frames counter and CPU usage throughout your stream to catch problems before viewers do. |
What I’ve learned from years of live streaming setups
The most common mistake new creators make is spending money on a camera before fixing their audio. I have watched creators invest in a $800 mirrorless setup while still using a built-in laptop microphone. The result is a beautiful image with audio that sounds like a phone call from 2009. Viewers leave. The camera upgrade meant nothing.
The second lesson took me longer to accept: test streams are not optional. Every time I skipped one to save time, something broke on air. A mismatched stream key, a microphone that switched to the wrong input, an OBS scene that was not set to the right output. Five minutes of private testing saves twenty minutes of public embarrassment.
The third thing I tell every creator I work with is to keep a mobile hotspot charged and ready. Your home internet will fail at the worst possible moment. A $30 per month data plan is the cheapest insurance you can buy for your stream reliability. Pair that with live streaming best practices and your broadcast quality will be noticeably more consistent within a month.
The creators who grow fastest are not the ones with the best gear. They are the ones who show up consistently, fix problems quickly, and treat every stream as a learning session.
— fan
Start streaming smarter with Fanspicy
Fanspicy is a paid social media and live cam platform built for creators who want to monetize their audience directly. If you are ready to take your live streaming beyond free platforms and start earning from your broadcasts, Fanspicy gives you the tools to do it.
Fanspicy supports tipping, paid interactions, and subscriber-based access, so your live streams generate income from day one. Explore the live cam earning potential on Fanspicy and see how other creators are building sustainable income from their streams. Visit Фанфікшн to create your account and start your first monetized broadcast.
ПОШИРЕНІ ЗАПИТАННЯ
What equipment do I need to start live streaming?
The minimum setup is a 1080p webcam, a USB microphone, and a wired internet connection with at least 10 Mbps upload speed. Prioritize your microphone before upgrading your camera.
How does YouTube live streaming work?
YouTube Live uses RTMP to receive your video feed from OBS Studio or similar software and converts it to HLS for viewers. Your channel must be verified and have no restrictions for 90 days before live streaming is available.
What bitrate should I use for a 1080p live stream?
Set your bitrate between 4,500 and 6,000 kbps for 1080p at 30fps. Your upload speed should be at least double your target bitrate to handle network fluctuations.
Why does my stream keep disconnecting?
RTMP connections drop instantly when the TCP connection is interrupted. Switch to RTMPS on port 443 in your OBS stream settings to avoid firewall blocks and improve connection stability.
Do I need to test my stream before going live?
Yes. A private or unlisted test stream of 3–5 minutes before every broadcast catches audio sync issues, dropped frames, and encoding errors before your audience sees them.